Learn the workings of Git, not just the commands
When you come from using a classical source code repository like Concurrent Versions System (CVS) or Subversion (SVN), it can be difficult to understand the flexibility and the possibilities of Git. This article tries to explain the workings of Git and how it all fits together, so you don't have to try to remember the commands, but instead just know what to do because you understand it well.
Note: this article has originally been published on IBM's developerWorks website in 27 January 2015, and is here republished within IBM's publishing guidelines. Here is the developerWorks link.
Git is a commonly used decentralized source code repository. It was created by the Linux creator Linus Torvalds for the management of the Linux kernel source code. Whole services like GitHub are based around it. It is even used in IBM's DevOps Services alongside the IBM Rational Team Concert® source code repository. So if you want to program in the Linux world or use IBM's DevOps Services with Git, it helps to have a good understanding of Git.
When I started working with Git I had some experience with Concurrent Versions System (CVS) and Apache Subversion (SVN), so I tried to understand it in terms of those classic source code repository systems. That way of thinking only got me a limited understanding of Git's capabilities. Since then I have grown to understand Git much better, so this article is a kind of "note to self" text to remind myself how Git works and explain it to those who are new to it. I assume you know your way around other more classical source code repositories like CVS or SVN.
Basics
So let's start with a basic example in a classical source code repository as in Figure 1. In a classical source code repository, folder with files and subfolders are handled as the content (CVS and Git don't actually handle folders, just files at a path location). The repository holds all versions of the content, while the working directory is the place where you modify the code. You checkout code from the repository to the working directory and commit changes you've made in this working directory back into a new version of the content in the repository.
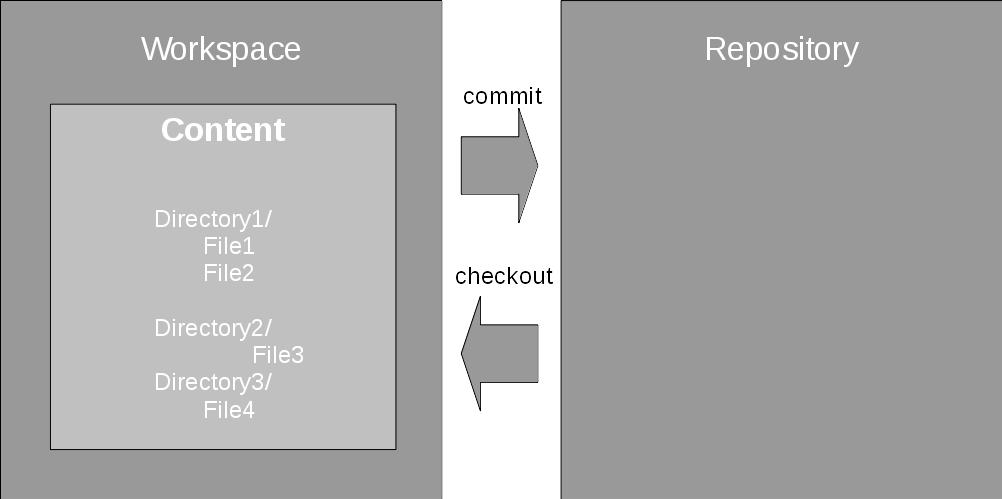
Figure 1. Classical source code repository workspace handling
Each commit creates a new child version of the content that derives from the previous, parent version that you modified, as shown in Figure 2. The content is stored as a series of versions, also called snapshots, linked by the parent-child relationship created by the commit operations. The information that has changed between a parent and child version by the commit is called the change set.
This series of versions is called a stream or branch. In SVN, the main stream is called trunk; in CVS it usually goes by the name HEAD; in Git it is usually named master. Branches are used in an implementation project to separate out the development of a specific feature or for the maintenance of an older version.
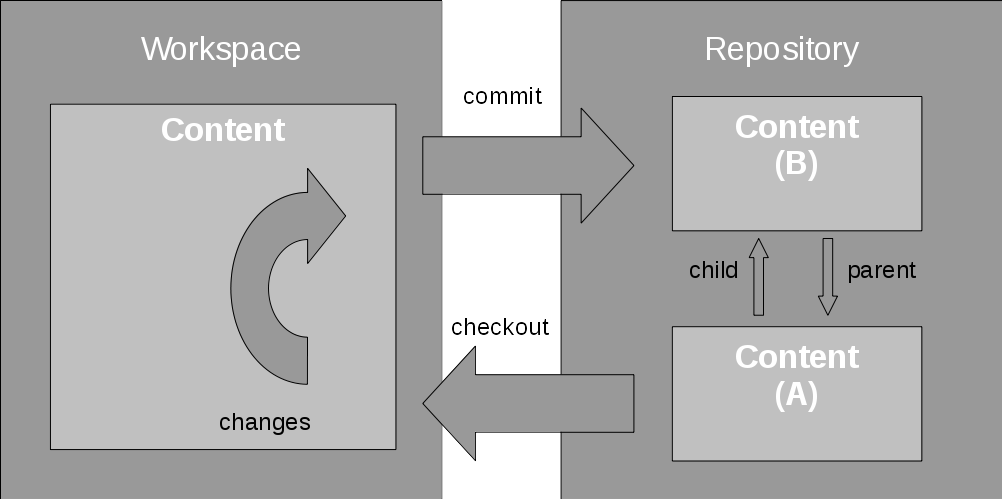
Figure 2. Creating a new version in a classical repository
So far Git looks very much like such classical source code repositories, doesn't it? Unfortunately, here is where the similarities end. One major feature of CVS and SVN is that they have a central repository. Git is decentralized. Multiple repositories can work together in a software development, and in fact do as each developer's repository works and communicates in the same way as any server-based Git repository.
So how does Git work?
The main principle of Git, once you understand it, is astonishingly simple.
First, Git handles content in snapshots, one for each commit, and knows how to apply or roll back the change sets between two snapshots. This is an important concept. In my opinion, understanding the concept of applying and rolling back change sets makes Git much easier to understand and work with.
This is the real basic principle. Anything else follows from this. So let's delve into Git a bit further.
Working with Git
To start working with Git, you just need to run the "git init" command. It turns the current directory into the Git working directory and creates the repository in the .git (hidden) directory it creates there. You can then start working with Git. The checkout and commit commands are similar to the other source code repositories, but the focus on change sets is the reason why in Git you have the add command (similar to SVN). With this command, a change in the working directory is added to the staging area for the next commit. This staging area is usually called the index. Figure 3 illustrates the process of creating a change set from snapshot version A to snapshot version B.
git status helps you keep track of which changes have been added, or not, on what branch you are on.
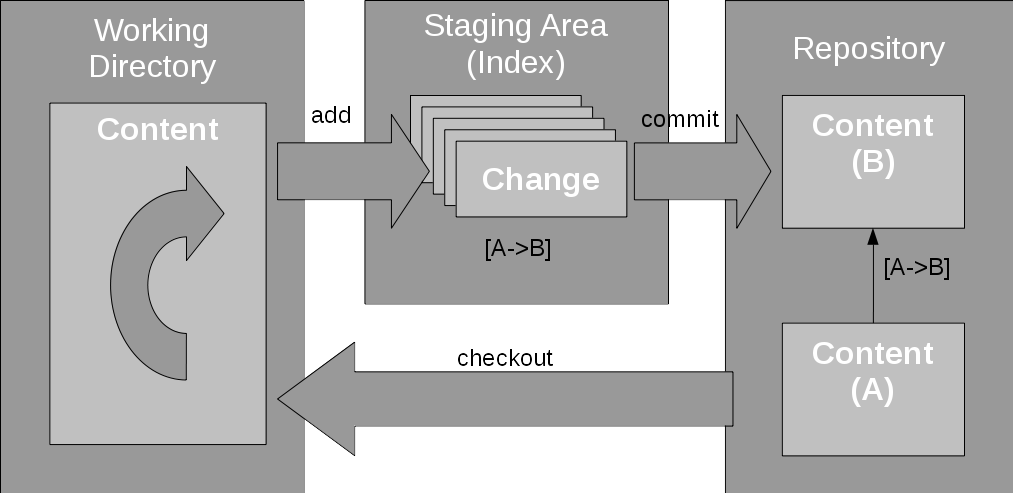
Figure 3. Creating a change set in Git
git log shows the history of the changes (i.e. commits) in the working directory, or with git log <path> the changes applied to the given path.
While git status lists the modified files in the workspace as well as the files in the index, you can look at the differences between files with the git diff command. Just using git diff (without parameters) only shows the changes in the working directory that have not yet been added to the index. You need to use git diff --cached to see what is actually in the index: the staged changes. git diff <name> or git diff <name> -- <path> shows the difference between the current working directory and the named commit for the working directory or the given path respectively. The name can be a commit ID, a branch name, or another name. This is a good time to talk about naming.
Naming
Note: Due to the length of the commit IDs, I will only use abbreviations like "(A)", "(B)", and so on in the diagrams.
Let's look at the naming of things in Git. Snapshots are the main elements in Git. They are named with the commit ID, which is a hash ID like "c69e0cc32f3c1c8f2730cade36a8f75dc8e3d480" for example. It is derived from the content of the snapshot, which comprises of the actual content and some metadata like time of submission, author information, parents, etc. The snapshot does not have a dotted number version like in CVS, or a transaction number (and path under the /branches top directory) as in SVN. Because of this, you cannot determine any kind of order from the Git snapshot names as you can in other repositories. Git can, for convenience, abbreviate these long hashes to short names by taking the minimum number of characters from the start of the ID, so that the short name is still unique within the repository. In the above example, the short name is "c69e0cc".
Note that the term commit, is used both as verb for creating a snapshot and as name for the resulting snapshot.
Normally you don't have to work with the commit IDs; instead you work with branches. A named stream of changes, in other source code repositories, is called a branch. In Git, a stream of changes is an ordered list of change sets as they are applied one after another to go from one snapshot to the next. A branch in Git is only a named pointer to a specific snapshot. It notes the place where new changes should be applied to when this branch is used. When a change is applied to a branch, then also the branch label moves to the new commit.
How does Git know where to put the change from a workspace? That is where HEAD points. The HEAD of the development is where you last checked out your workspace and, more importantly, where to commit the changes. It usually points to the branch you last checked out. Note that this is different from CVS' interpretation of the term HEAD as the tip of development of the default branch.
The tag command names a commit and allows you to address the individual commit with a readable name. Basically, a tag is an alias for a commit ID but commits can also be addressed with some shortcuts. HEAD as the tip of development in the working directory. HEAD^1 is the first parent of the HEAD commit, HEAD^2 the second and so on.
For more details, see the man page to gitrevisions. Because names like tags or branch names are references to commits, they are called refnames. A reflog shows what has been changed during the lifetime of the name, from when it was created (usually by a branch) until the current state.
Branching
The concept behind branching is that each snapshot can have more than one child. Applying a second change set to the same snapshot creates a new, separate stream of development. And if it is named, it is called a branch.
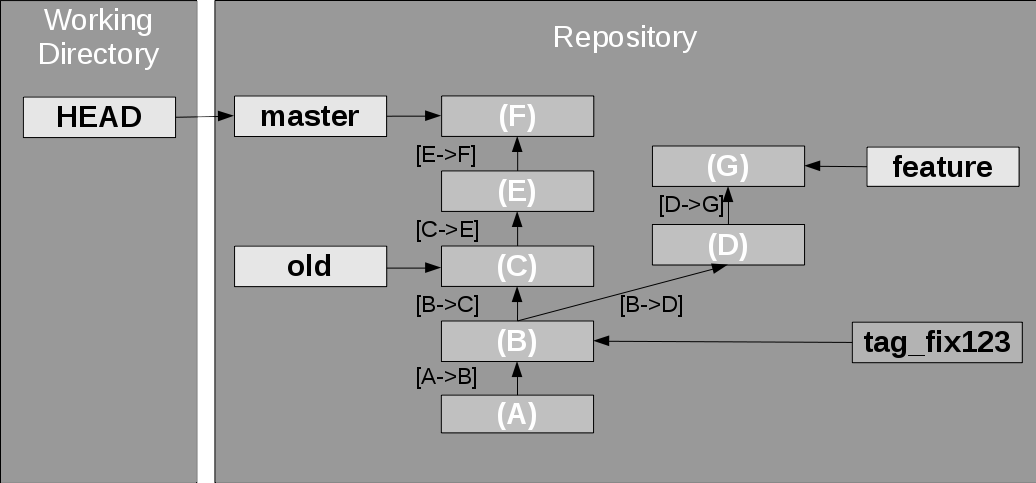
Figure 4. Example branch structure in Git
Figure 4 illustrates this with a sample branch structure in Git. A master branch where some development happens currently points to snapshot F. Another old branch marks an older snapshot, perhaps a possible fix development point. A feature branch has other changes for a specific feature. Change sets are noted as going from one version to another, for example "[B->D]". In this example the snapshot B has two children, two development streams going from there, one for the feature branch and one for the others. Commit A has also been tagged as fixing bug number 123.
Branches are created with the git branch <branch name> command on the current HEAD, or git branch <branch name> <commit id> on any valid snapshot version. This creates a new branch pointer in the repository. Be careful, branching this way leaves your workspace at the old branch. You need to checkout the new branch first. With git checkout -b <branch name> the new branch is created, and your workspace is also moved to the new branch.
Two other commands are rather useful:
git diff <branch> -- <path>
as already mentioned above prints a diff of the given path (file or directory) between the current working directory and the specified branch.
git checkout <branch> -- <path>
checks out files from a different branch into the working directory, so you can pick changes from another branch.
Merging
When you implemented your new feature, you checked it into the repository, for example, on your "feature" branch. When the feature is finished, you need to merge it back into the master branch. You do this by checking out the master branch, and use git merge <branch name> Git then merges the changes from the given branch into the checked out branch. What Git does to achieve this is it applies all of the change sets from the feature branch onto the tip of the master branch.
Depending on the type of changes in the two branches, and possible conflicts, there are three possibilities that can happen.
- Fast forward merge: The receiving branch did not get any changes since the two branches diverged. The receiving branch still points to the last commit before the other branch diverged. In this case, Git moves the branch pointer of the receiving branch forward as shown in Figure 5. Because there is nothing to do besides moving the branch pointer forward, Git calls this a fast forward merge.
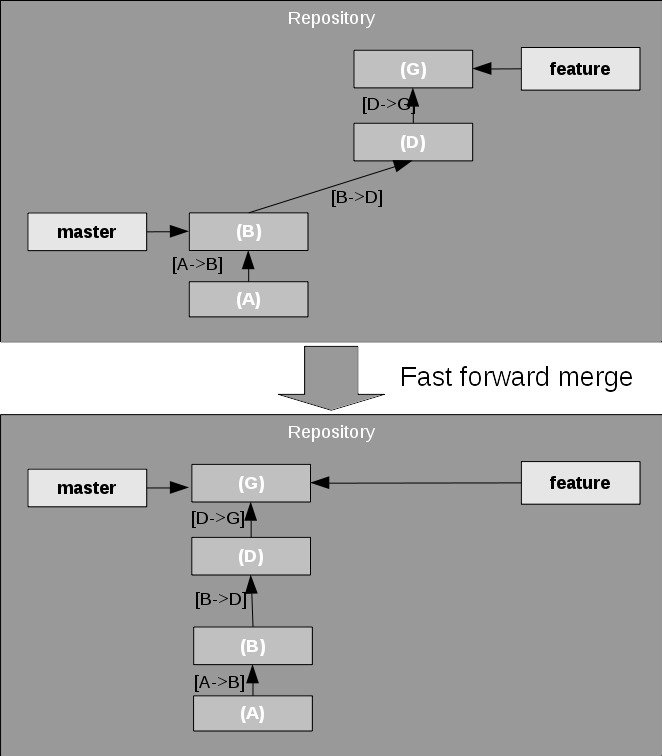
Figure 5. Fast forward merge
- No-conflict merge: There are changes in both branches but they do not conflict. This happens, for example, if the changes in both branches affect different files. Git can automatically apply all changes from the other branch into the receiving branch, and create a new commit with these changes included. The receiving branch is then moved forward to that commit as shown in Figure 6. Note that the resulting commit, the merge commit has two parents. I haven't noted the change sets here, though. In principle, the change set from (E) to (H) would be the combination of all change sets from the feature branch since the diversion of the two branches, but this probably drives the analogy too far.
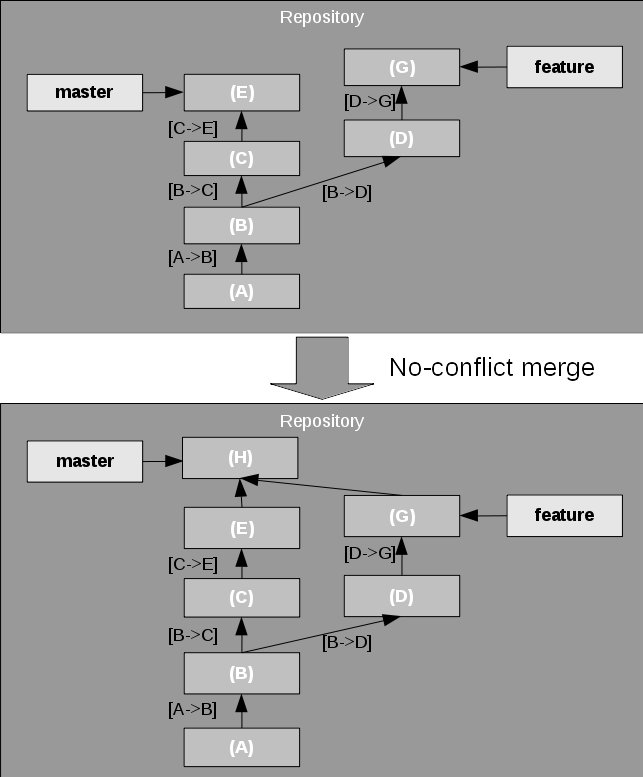
Figure 6. No-conflict merge
- Conflicting merge: There are changes in both branches, but they conflict. In this case, the conflicting result is left in the working directory for the user to fix and commit, or to abort the merge with git merge --abort.
One interesting thing to note is that merging finds instances where the same patch has been applied in both branches. Because you have changes in both branches, this would normally lead to a conflict but as Git is intelligent enough to detect this situation, you can still have a fast-forward merge.
The concept of rolling back and replaying change sets carries even further with advanced features like rebasing and cherry picking.
Sometimes you develop a feature, but the master development also heads on in parallel and you don't want to merge your feature just yet. The consequence would be that the two branches move away from each other quite quickly. It is, however, possible to apply change sets from one branch to another. Git offers the rebase and the cherry-picking feature for that. Rebasing
Imagine that you are developing your feature and need to incorporate the latest changes from the master branch to keep up with general development. This is called rebasing your feature branch; it moves the diversion point between the two branches up on one of the branches. What Git does is, it then replays the changes from one branch on top of the tip of the other branch, creating new commits for each of the original commits. In the example shown in Figure 7, it tries to apply the changes from the feature branch on top of the master branch.
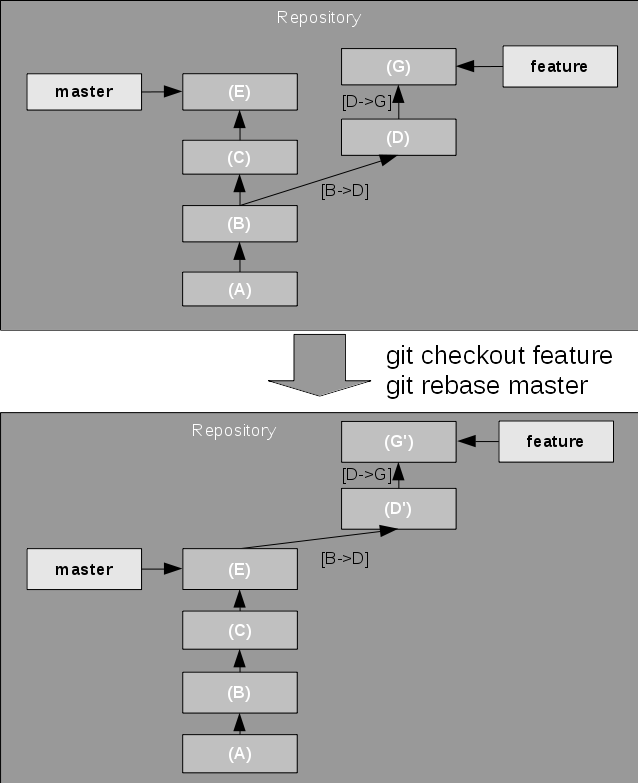
Figure 7. Rebasing a branch
If the replay results in a conflict, rebase stops at the first conflict and leaves the conflicting state in the working directory for the user to fix. Then the rebase can be continued or aborted.
With the --onto option, the rebase can actually move the diversion point "onto" any newer snapshot in the other branch.
Cherry picking
Imagine you are now working on a feature, and have developed some change that should be put into your master development immediately. This could be a bug fix, or a cool feature but you don't want to merge or rebase the branches yet. Git allows to copy a change set from one branch to another by using the cherry pick feature.
In this situation, as shown in Figure 8, Git just applies the change set leading to the selected snapshot on the HEAD, say the master branch. Here you usually actually use the commit ID, also known as the hash value.
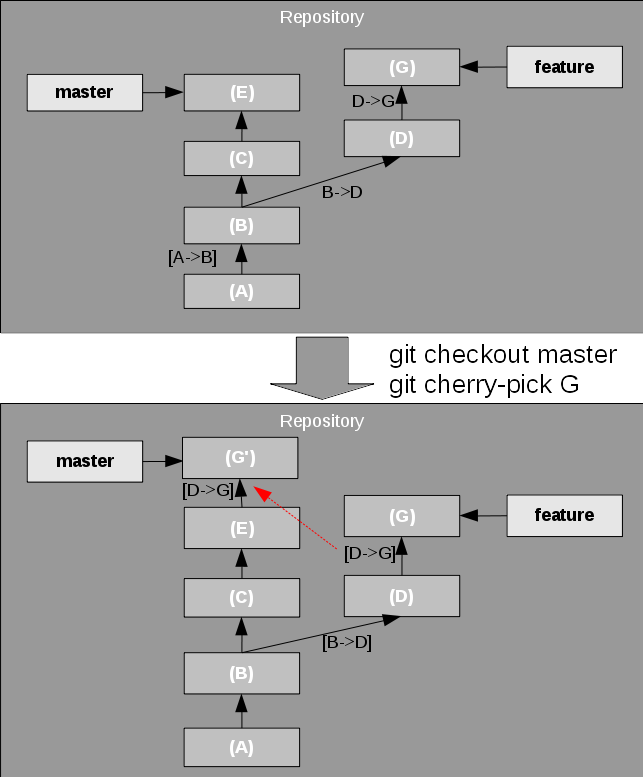
Figure 8. Cherry picking a commit
Revert
The revert command rolls back one or more patch sets on the working directory, then creates a new commit on the result. revert is almost the reverse of a cherry pick. See Figure 9 for an example.

Figure 9. Reverting a commit
The revert command documents the revert as a new commit. If you don't want that to be documented, you can reset the branch pointer to an earlier commit but this is out of scope for this article.
So why did I go over this section in such detail? It is because it is crucial to understand these features when discussing the collaborative features in the next section. In fact, once you understand this first section, the second section will be almost immediately clear. Most of the collaborative functionality is based on the base functionality discussed so far.
Collaboration
In classical source code repositories there is always a clear notion what a branch is; it's the one on the central repository.
In Git, however, there is no such thing as a master branch. Wait, didn't I write above that there commonly is a master branch? Yes, I did. However. This master branch only exists locally. There is no relationship between the master branch in one repository and the one in another repository, except for the relationship you create.
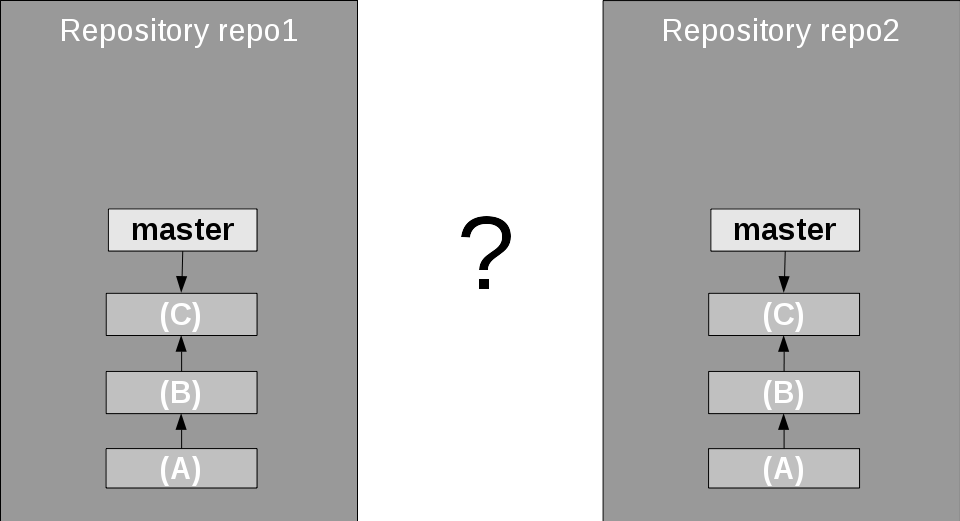
Figure 10. Two repositories
If you already have a repository, you can add remote repositories with the git remote add command. Then you can get a mirror of a remote branch in your own repository with the fetch command. This is called the remote tracking branch because it tracks the development on the remote system.
When you check out a branch that only exists as a remote tracking branch (but not as a local branch), Git automatically creates the local branch from the remote tracking branch and checks this one out.
Once you have that, you can merge the contents of the remote branch into your own branch. Figure 11 shows the checkout into the local master branch, but that does not need to be the case, you could merge it into any other branch with a common history like the normal merge command.
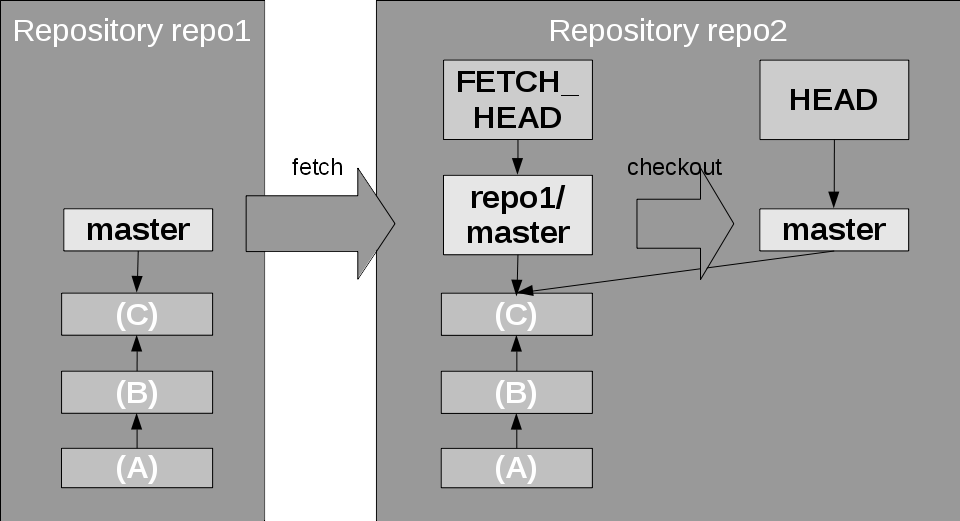
Figure 11. Fetching and checking out a remote branch
An alternative is the git clone command that gets a remote repository, for example, from a hosting service. This automatically gets all of the remote branches (but not yet the local references) and checks out the master branch.
As you can see, a pattern emerges. Because the remote repository branch is "just a branch", all the things discussed above about branching, merging etc. almost seamlessly apply here, especially when getting changes from the remote repository.
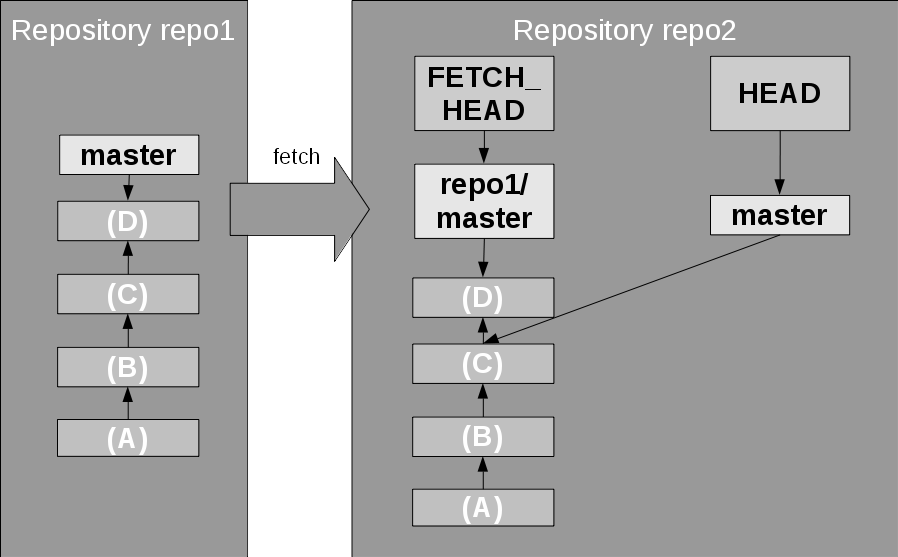
Figure 12. Fetching remote changes
In Figure 12, a git fetch is shown; it updates the remote tracking branch. Then you just do a normal merge operation between the remote tracking branch and the local branch, in this example git checkout master; git merge repo1/master. After a fetch you can use the FETCH_HEAD name in the merge command as shortcut to the fetched remote branch, like git merge FETCH_HEAD. Also, similar to the discussion above, this merge could result in a fast-forward merge, a no-conflict merge, or a conflict that needs to be resolved manually.
The git pull command is a convenient command that combines fetch with merge.
When changes have been committed to the local branch, they have to be transported to the remote branch. This is done with the push command that pushes local changes to the remote branch. It is the opposite of fetch, not the opposite of pull. However, it does more than just fetch, because it updates the local copy of the remote branch, as well as the remote branch in the other repository, as shown in Figure 13. push also allows you to create new branches in the remote repository.
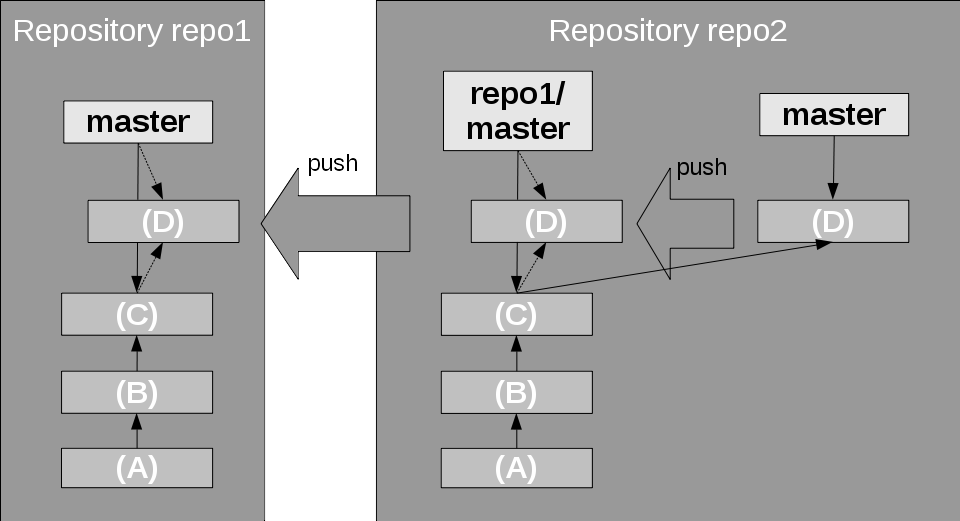
Figure 13. Pushing a change
There is one safeguard. It only succeeds, and otherwise aborts, when the push would result in a fast-forward merge on the remote branch, in the remote repository. If that is not the case, then the remote branch already has some other changes (commits) from other repositories or committers. Git aborts the push and leaves everything as it is. Then you have to fetch the changes, merge them into your local branch, and try to push again.
Note that in such cases you could do a normal merge, but also have the option to do a rebase merge to rebase the changes in your local branch to the new, updated head of the remote branch.
Besides the fetch and push commands there is another way of distributing patches; the old style, via mail. For this there is the command git format-patch <start-name> which creates a patch file for each commit that leads from the given commit to the state of the current branch. git am <mail files> applies these patch files to the current branch.
Caveats
One caveat: If you try push into a repository where someone actually tracks the branch and locally works on it. This would probably mess up the branch management so Git warns you about it and tells you to first synchronize the state of the remote branch with a pull.
It also becomes clear that you should not rebase a remote tracking branch. It would not match the remote branch anymore, thus it would not give a fast-forward merge on push. You have broken your repository structure.
Advanced Git
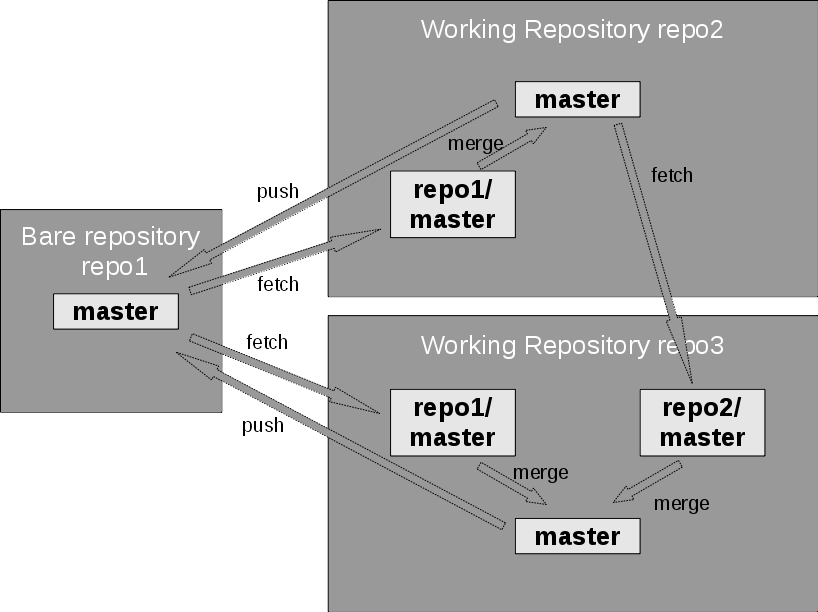
Figure 14. Example for a multi-repository structure
Normally even with Git, there is a star structure where there is one central repository that serves as the main repository, and local repositories for each user. But this doesn't have to be the case. You could add remote repository connections as in a web, with cross-connections, for example, as seen in Figure 14.
Above I have described the rebasing as replaying of change sets on top of a different branching (or diversion) point from the original branch. Git normally does the replay in the order in which the commits have been made. As an advanced feature git rebase -i allows you to actually select which commits should be made in which order, and even if commits can be deleted or two commits can be combined ("squashed"). Just make sure you don't do this to commits that have already been pushed - otherwise, those that have work based on these commits may get a lot of conflicts.
I have also written how to check out a specific branch but you can also check out any commit (snapshot). This lets the HEAD pointer point to the commit, and not the branch. This is called detached HEAD mode. When you commit a change in this situation, you start a new stream of development. Basically you branch out, but without having given a branch name to this new branch. The tip of development is only reachable by using a commit ID; it is not reachable by any refname. You can create a branch from this HEAD though using the usual "git branch <branchname> command.
What happens to commits that are unreachable by any reference? Well, if you do not do anything special, they are kept in the repository. However, you can and hosting services might actually run git gc, the Git garbage collector to remove unnecessary files. Commits not reachable by any refname are unnecessary and will thus be removed. So it is good practice to always work on a real branch, especially when it is so fast and easy to create a new branch in Git.
Conclusion
Git on one side is based on simple principles but the flexibility it provides can be overwhelming at times. The main takeaway is that Git manages snapshots and the change sets between snapshots. The most common commands apply and roll back those change sets between the different branches. The second takeaway is that handling a remote branch is basically the same as handling a local branch because there even is a local mirror of the remote branch.
With this I have finished my speed run through the workings of Git. These commands cover basically all of what I do with Git. More details to all the commands can be found in the respective man pages, and with the knowledge given here you are hopefully better able to understand them and use them. Also, the commands themselves and git status often give valuable hints on what to do next.
Another great tool to help you understand Git is the graphical gitk tool that shows the structure of the local repository. Use gitk --all to show all branches and tags, etc. It also provides a simple interface to initiate actions on Git.
Git is usually already installed on your Linux system. You may have to install development tools from your package manager. For Windows you can download it on the Git homepage.
I hope now you have a better understanding of the workings of Git and are not afraid to use its flexibility.
Thanks for some interesting discussions on this topic and for reviewing this article go to my colleague Witold Szczeponik who understands Git even better than I do.
Resources
Learn
- Find out more about Git.
- Read an introduction to Git.
- Learn some basic information on Git branching and merging.
- Understand Git with a conceptual tutorial.
- Read the different ways people have used Git on Bluemix, and see the apps created (and use the code to do this yourself).
Get products and technologies